Crafting a traditional Okinawan Shisa statue combines sacred artistry with protective symbolism, and I’ll guide you through this meaningful process.
You’ll start with authentic Ryukyu clay, carefully kneading and shaping it into the distinctive lion-dragon guardian form that’s been protecting Okinawan homes for centuries.
The male Shisa’s open mouth and female’s closed mouth each serve specific spiritual purposes, while details like the protective ball and spiral motifs enhance their power.
After a 20-day drying period and firing at 1,200°C, you’ll personalize your guardian with vibrant glazes and meaningful patterns.
There’s an entire world of traditional techniques and cultural significance waiting to transform your Shisa from clay to cherished protector.
What Makes Shisa Special
Guardian spirits stand at the heart of Okinawan culture through the iconic Shisa statues.
I’ve found that these mythical creatures, blending the majestic features of lions and dragons, tell a fascinating story of cultural exchange along the ancient Silk Road that you won’t find anywhere else.
The traditional arts of Okinawa have shaped these guardian figures for generations, making each pair uniquely special.
When you look at a traditional Shisa pair, you’ll notice how they work in perfect harmony – the open-mouthed male fiercely repels evil spirits, while his female counterpart keeps good fortune safely contained with her closed mouth.
I’m particularly moved by the legendary tale of how a single Shisa statue saved the village of Madanbashi from a menacing sea dragon.
Today, you’ll find these guardians perched atop rooftops and standing sentinel at doorways, continuing their centuries-old tradition of protection and spiritual balance.
These protective figures have become powerful symbols of peace, much like the Okinawa Peace Park that honors the island’s profound history.
Choosing Your Workshop Location
Throughout Okinawa, aspiring Shisa craftspeople can find workshops ranging from bustling city centers to serene pottery villages.
I’ve explored these creative spaces extensively, and I’ll help you find the perfect spot for your crafting journey. Many visitors combine their workshop experience with stops at must-see destinations throughout the island.
While crafting your Shisa, you might hear traditional Okinawan music playing softly in the background, adding to the authentic atmosphere.
Here are the top locations where you can craft your own Shisa:
- TRIP CRAFT NAHA on Kokusai Street – perfect for spontaneous creators with its no-reservation policy
- Ryukyu Kiln Workshop near Churaumi Aquarium – ideal for combining craft time with sightseeing
- Historic Tsuboya Yachimun Street – where you’ll feel the pulse of Okinawa’s pottery tradition
- Okinawa World’s Culture Center – offering deep insights into Shisa’s fascinating history
- Yomitan Pottery Village – a hidden gem for authentic crafting experiences
Each location has its unique charm, but I’d recommend starting with TRIP CRAFT NAHA if you’re staying in the city center.
Preparing Your Materials

Now that you’ve selected your workshop, let’s focus on getting your materials ready for crafting a traditional Shisa.
I’ll help you gather everything you’ll need, starting with the cornerstone of our project – authentic Ryukyu clay that’ll form the soul of your guardian lion.
While many luxury travel experiences in Japan focus on traditional crafts, creating your own Shisa offers a uniquely personal connection to Okinawan culture.
Just as travel safety remains paramount in Japan, maintaining proper precautions during crafting is essential.
| Essential Item | Why It Matters |
|---|---|
| Ryukyu Clay | Creates that authentic connection to Okinawan tradition |
| Sculpting Tools | Helps bring your vision to life with precise details |
| Protective Gear | Keeps you safe while channeling your inner artist |
| Kiln Access | Transforms your creation into a lasting masterpiece |
| Quality Paints | Breathes personality into your unique guardian |
Before we jump in, you’ll need to prepare your clay by kneading it thoroughly – think of it as giving your Shisa its first massage.
I’ve found that maintaining the perfect moisture balance is vital; your clay should feel like firm cookie dough.
Understanding Traditional Shisa Designs
At the heart of Okinawan culture, traditional Shisa designs carry deep symbolic meaning that’s essential to understand before you begin crafting.
I’ll walk you through the key elements that make these mythical guardians so special and help you create authentic pieces.
- Male Shisa feature open mouths to ward off evil spirits, while females keep their mouths closed to protect good fortune.
- Traditional pairs are placed with the male on the right and female on the left.
- Colors typically include earthy reds and blacks, though modern interpretations vary.
- Facial features should be fierce yet friendly, with prominent eyes and distinctive fangs.
- Each Shisa needs a strong, lion-like mane and dog-like body structure.
Much like the culinary traditions that define the region, each Shisa carries unique artistic elements reflecting its maker’s style.
You’ll want to pay special attention to these defining characteristics as you sculpt your own Shisa, ensuring they maintain their protective powers while showcasing your artistic touch.
Just as Okinawa soba noodles represent a cherished cultural tradition, Shisa statues remain an integral part of the island’s heritage.
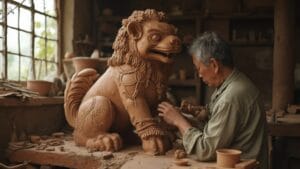
Molding The Basic Shape

A ball of fresh clay marks the beginning of your Shisa’s journey. I’ll guide you through transforming this humble lump into a guardian that embodies centuries of Okinawan tradition.
Working in tropical weather patterns means your clay may dry faster than expected, so keep it properly moistened as you work.
Just like public buses that run on precise schedules in Okinawa, timing is crucial when working with clay.
Start by kneading the clay thoroughly to remove those pesky air bubbles that could cause problems during firing.
Shape your basic form into an oval mass for the body, making sure it’s stable enough to support the weight of the head you’ll add later.
I’ve found that maintaining even thickness throughout is essential – think of it as giving your Shisa a balanced foundation for life.
While working, keep checking your symmetry from multiple angles; I like to rotate the piece frequently as I shape it.
Creating Facial Features
With your Shisa’s body taking shape, let’s focus on bringing its guardian spirit to life through its expressive face.
I’ll guide you through creating those distinctive features that make each Shisa unique and powerful.
Much like Kyoto’s traditional crafts, each Shisa carries its own artistic heritage and cultural significance. The attention to detail mirrors the regional specialties found in traditional Fuji cuisine.
First, decide whether you’re crafting a male or female Shisa, as this will determine your mouth design. Remember these key elements as you sculpt:
- Male Shisa traditionally feature open mouths to ward off evil spirits
- Female Shisa typically have closed mouths to keep good fortune within
- Eyes should be large and round, carefully shaped for maximum impact
- Keep the nose modest but defined to balance the facial features
- Add texture and detail gradually, building character through each stroke
Now, as you shape these features, don’t worry about perfect symmetry – slight irregularities give your Shisa personality and make it uniquely yours.
Adding Cultural Symbols

Traditional Okinawan symbols transform your Shisa from a simple statue into a powerful cultural guardian.
I’ll show you how to incorporate elements like the protective ball, which you’ll want to place beneath your Shisa’s paw to represent its spiritual authority and strength.
When you’re selecting decorative patterns, I recommend using traditional symbols that enhance your Shisa’s protective qualities.
You might reflect on adding spiral motifs that represent the flow of energy, or incorporating auspicious colors like deep red for protection.
I’ve found that natural materials from Okinawa, such as local clay or traditional glazes, can strengthen your Shisa’s cultural authenticity.
Consider adding Okinawan sea salt to your clay mixture, as this local ingredient is a treasured souvenir that connects your craft to the island’s heritage.
Don’t forget to contemplate whether you’re crafting a male or female Shisa – this will influence which symbols you’ll want to emphasize in your design.
Much like the cherry blossoms of Okinawa that symbolize renewal and beauty, each decorative element you choose adds layers of meaning to your Shisa.
Drying and Glazing Process
Patience plays an essential role in the drying and glazing of your Shisa, as rushing these steps can compromise the final result.
I’ll guide you through the essential stages that transform your raw clay guardian into a lasting work of art.
Let’s break down the key steps you’ll need to follow:
- Allow your Shisa to dry naturally for about 20 days, depending on its size and the humidity levels.
- Apply your chosen glaze carefully, keeping in mind it’ll interact uniquely with the clay during firing.
- Fire your creation at 1,200°C for approximately two days in the kiln.
- Watch for the magical transformation as oxygen levels influence the final coloring.
- Let your Shisa cool completely before handling – trust me, it’s worth the wait.
These steps might seem time-consuming, but they’re vital for creating a Shisa that’ll last for generations.
While you wait for your Shisa to dry, consider exploring Okinawa’s water sports activities to pass the time productively.
Painting Your Shisa Guardian

So you’ve reached the exciting stage of painting your Shisa guardian? You’ll be thrilled to know that you’ve got about 45 minutes to bring your creation to life with a palette of six vibrant colors.
I’d recommend starting with a clear vision of your design, whether you’re drawn to traditional patterns or feeling inspired to create something more contemporary.
You’ll find an array of paint options at your disposal, from standard colors to eye-catching glittering and glossy finishes that’ll make your Shisa truly unique.
Don’t feel pressured to follow strict rules – this is your chance to express yourself through color and design.
As you work, remember that each brushstroke adds personality to your guardian, making it distinctly yours among the countless Shisa protecting homes across Okinawa.
Personalizing Your Creation
Personalization brings your Shisa guardian to life through a blend of traditional elements and individual creativity.
I’ll show you how to make your Shisa uniquely yours while honoring Okinawan crafting traditions.
Here’s what you’ll want to reflect upon when adding personal touches to your creation:
- Combine traditional motifs with modern elements that speak to your artistic vision
- Choose colors that reflect your personality – from earthy traditional tones to bold, contemporary hues
- Add meaningful symbols or protective elements like small cubs or crystal balls
- Create a complementary pair of male and female Shisa for complete spiritual protection
- Incorporate local elements like red clay tiles or Okinawan patterns into your design
Displaying Your Finished Shisa

Proper placement of your Shisa guardian is essential for maximizing its protective powers within Okinawan tradition.
When displaying your handcrafted pair, you’ll want to position them at your entrance, with the open-mouthed male facing outward to ward off negative energy and the closed-mouth female facing inward to keep good fortune within.
| Location | Positioning | Male Shisa | Female Shisa |
|---|---|---|---|
| Main Entrance | Both sides | Right side | Left side |
| Rooftop | Front edge | Faces out | Faces in |
| Garden Gate | Both posts | Faces street | Faces home |
| Indoor Shrine | Elevated spot | East-facing | West-facing |
I recommend placing your Shisa where they’ll be visible yet protected from harsh weather.
If you’re following feng shui principles, you might consider positioning them to face the direction from which you believe challenges most often approach.